Photographs serve as windows to the past, preserving cherished memories and moments for generations to come. However, over time, photos can become damaged, with tears and rips compromising their integrity. Ripped and torn photo repair is a valuable technique that allows us to salvage and restore these damaged photographs, ensuring that their stories are preserved. In this guide, we’ll explore the art of ripped and torn photo repair, its importance, techniques, and how you can breathe new life into your treasured memories.
Understanding Ripped and Torn Photo Repair
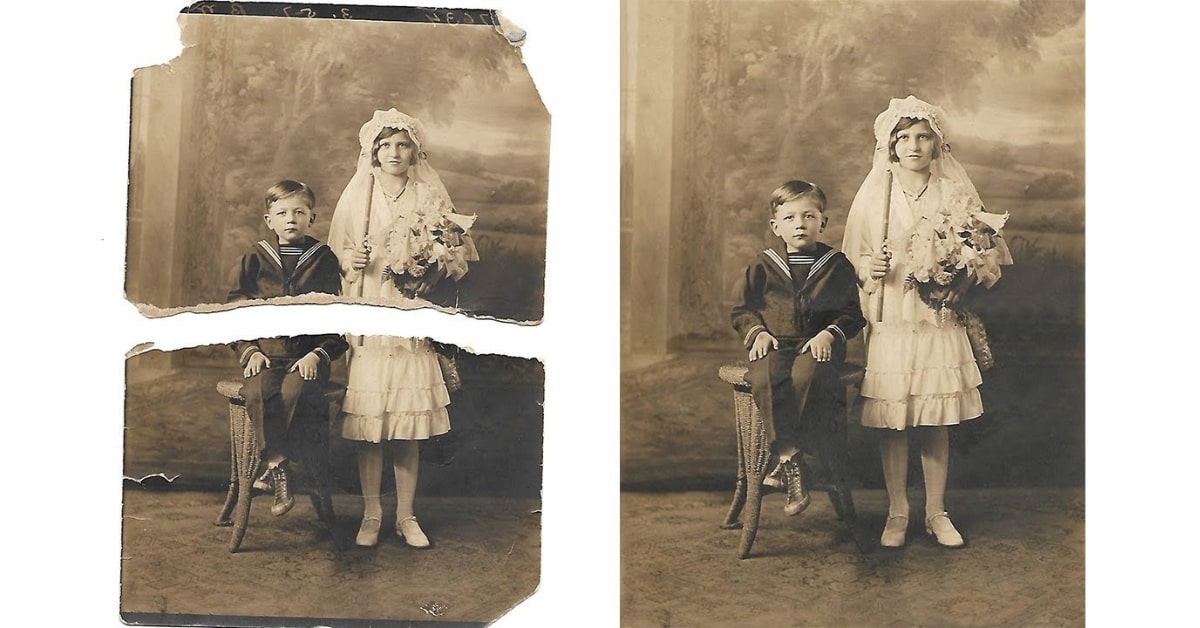
Ripped and torn photo repair is the process of digitally restoring damaged photographs to repair tears, creases, and other imperfections. This technique involves using photo editing software to meticulously reconstruct missing areas, blend damaged areas, and enhance overall image quality.
Importance of Ripped and Torn Photo Repair
- Preserving Memories: Ripped and torn photo repair allows us to preserve and protect precious memories captured in damaged photographs, ensuring that they can be enjoyed for years to come.
- Restoring Visual Integrity: By repairing tears and rips, ripped and torn photo repair restores the visual integrity of damaged photographs, allowing the images to be viewed and shared without distraction.
- Honoring History: Many damaged photographs hold historical significance, documenting important moments and events in the past. Ripped and torn photo repair helps to preserve these historical artifacts for future generations to study and appreciate.
- Emotional Connection: Restoring damaged photographs can evoke strong emotions and nostalgia, strengthening the emotional connection to the memories captured in the images.
Techniques for Ripped and Torn Photo Repair
- Image Scanning: Start by scanning the damaged photograph at a high resolution to create a digital copy. This ensures that you have a clean and accurate base image to work with during the repair process.
- Tear Reconstruction: Use the cloning and healing tools in photo editing software to reconstruct torn or missing areas of the photograph. Carefully blend in surrounding details to create a seamless repair.
- Texture Matching: Match the texture and grain of the repaired areas to the surrounding image to ensure a natural and cohesive result. Adjust opacity and blending modes as needed to achieve a seamless blend.
- Color and Contrast Adjustment: Use color correction and contrast adjustment tools to match the repaired areas with the rest of the image. This helps to ensure consistency and visual harmony throughout the photograph.
FAQs
Can any type of damage be repaired using ripped and torn photo repair techniques?
Ripped and torn photo repair techniques can be used to repair a wide range of damage, including tears, creases, stains, and scratches.
How long does it take to repair a ripped or torn photograph?
The time required to repair a ripped or torn photograph depends on various factors, including the extent of the damage, the complexity of the repair, and the skill level of the editor.
Is ripped and torn photo repair reversible?
Yes, ripped and torn photo repair techniques are non-destructive, meaning they can be applied without permanently altering the original photograph.
Are there any tips for preventing further damage to repaired photographs?
To prevent further damage to repaired photographs, store them in acid-free archival sleeves or albums, and avoid exposing them to direct sunlight, moisture, or extreme temperatures.
Conclusion
Ripped and torn photo repair is a valuable skill that allows us to preserve and protect damaged photographs, ensuring that their stories and memories can be passed down through generations. By mastering the techniques outlined in this guide, you can breathe new life into old photographs, restoring their visual integrity and emotional resonance. So go ahead, pick up your damaged photographs, and embark on a journey to restore and preserve your treasured memories for years to come!
This page was last edited on 29 February 2024, at 9:19 am