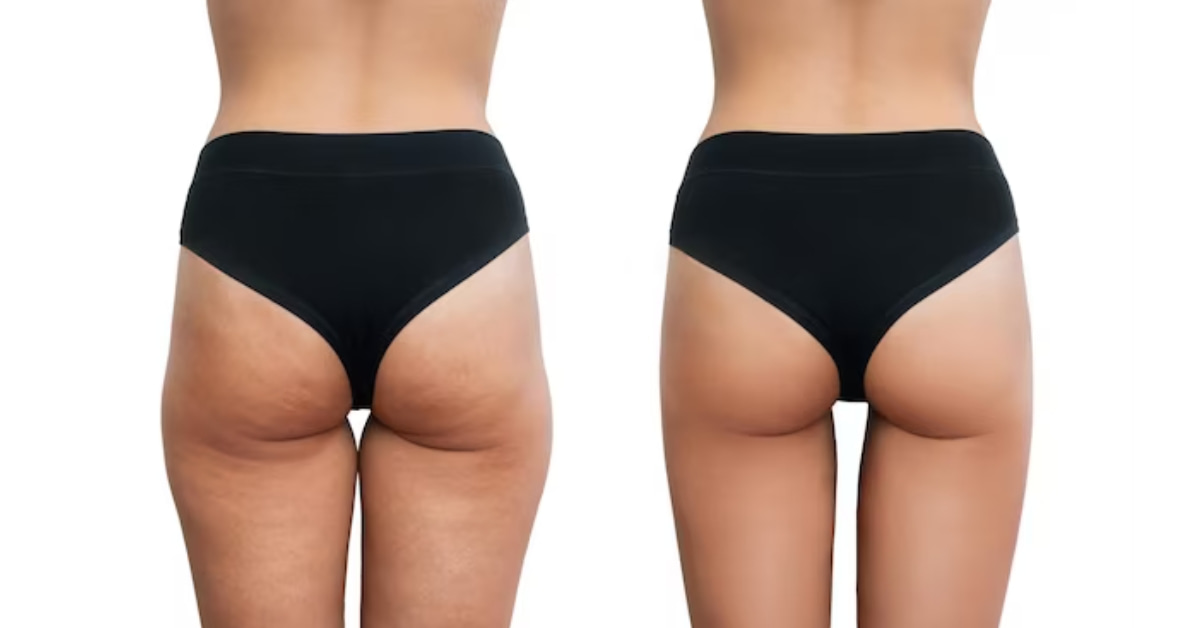
In the age of digital beauty, Photoshop has become a powerful ally in perfecting our visual narratives. One common concern that many individuals have is the appearance of cellulite in photos. Fortunately, with the right techniques, it’s possible to remove cellulite in Photoshop, turning flawed images into seamless, stunning portraits. In this article, we’ll explore the step-by-step process, tips, and ethical considerations for achieving flawless results.
The Art of Cellulite Removal in Photoshop
Cellulite is a natural feature of the skin, but digital tools allow us to enhance our images in ways that can boost confidence and highlight our best features. Here’s a comprehensive guide on how to remove cellulite in Photoshop:
Step 1: Open the Image
Begin by opening the image in Photoshop. Choose a high-resolution photo to ensure better editing results.
Step 2: Select the Healing Brush Tool
Select the Healing Brush Tool from the toolbar. This tool is effective for removing imperfections while preserving the texture of the skin.
Step 3: Adjust Brush Settings
Adjust the brush settings, including size and hardness, to match the specific area you’re retouching. A softer brush is ideal for blending seamlessly.
Step 4: Sample a Nearby Area
Hold down the Alt key (Option key on Mac) and click on an area close to the cellulite that has a smoother texture. This samples the texture you want to replicate.
Step 5: Paint Over the Cellulite
Gently paint over the cellulite with the Healing Brush. Photoshop will intelligently blend the sampled texture with the surrounding area, minimizing the appearance of cellulite.
Step 6: Zoom In and Refine
Zoom in to refine details and ensure a natural-looking result. Take your time to adjust the brush size as needed for different parts of the image.
Step 7: Final Touches
After removing the cellulite, apply any final touches or adjustments to the image. Consider adjusting lighting, color balance, or adding filters for an overall polished look.
Tips for Ethical Editing
- Moderation is Key: Aim for a natural look and avoid excessive retouching that distorts reality.
- Maintain Skin Texture: Preserve the natural texture of the skin to prevent an overly airbrushed appearance.
- Communication is Vital: If editing photos for clients, ensure open communication about retouching preferences and ethical considerations.
FAQs
Is it ethical to remove cellulite in Photoshop?
Ethical considerations vary, but it’s crucial to maintain a balance between enhancing confidence and avoiding unrealistic portrayals
Can beginners effectively remove cellulite in Photoshop?
With practice, beginners can achieve satisfactory results. Start with small adjustments and gradually refine your skills over time.
Are there alternative tools for cellulite removal in Photoshop?
Yes, tools like the Spot Healing Brush and Clone Stamp can also be effective. Experiment with different tools to find the one that suits your editing style.
Should I remove all cellulite or leave some for a natural look?
The choice is subjective. Some prefer a completely smooth appearance, while others may choose to retain a natural look by minimizing rather than eliminating cellulite.
Conclusion
Removing cellulite in Photoshop is an art that requires both technical skill and ethical consideration. By following these steps and tips, individuals can enhance their photos while maintaining a sense of authenticity. Whether for personal satisfaction or professional projects, mastering the art of cellulite removal empowers us to present our best selves in the digital realm.
This page was last edited on 27 February 2024, at 1:09 pm