In the realm of product photography, imperfections like dust and scratches can detract from the allure of your offerings. Fortunately, Adobe Photoshop offers robust tools and techniques to restore and refine product images effortlessly. Let’s delve into the step-by-step process of removing dust and scratches during photo editing to elevate your visuals.
Understanding the Challenge
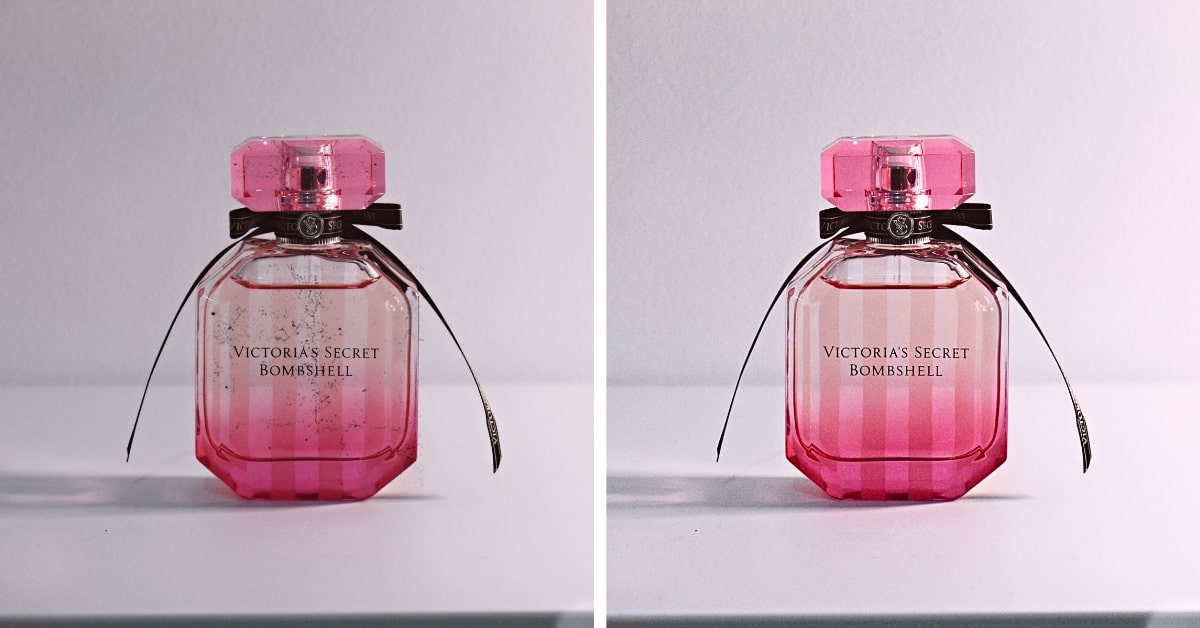
Dust particles and scratches are common adversaries in product photography, especially when shooting physical items. These imperfections can distract viewers from the product’s essence, potentially impacting purchase decisions.
Step-by-Step Guide to Dust and Scratch Removal
- Open the Image: Launch Photoshop and import the product image you want to refine using File > Open.
- Zoom In and Identify Imperfections: Use the Zoom tool to magnify areas with visible dust or scratches for precise editing.
- Select the Healing Brush Tool: Located in the toolbar, the Healing Brush Tool (Shortcut: J) is ideal for removing imperfections seamlessly.
- Adjust Brush Size and Hardness: Right-click on the image to adjust the brush size and hardness for precise editing around different areas of the product.
- Sample Clean Areas: Hold Alt (Option for Mac) and click on a clean area near the imperfection to set it as the sampling source for the Healing Brush Tool.
- Remove Dust and Scratches: Click and drag the Healing Brush over the imperfections to blend them with the sampled clean area. Repeat for other affected regions.
- Fine-tune as Necessary: Use the Undo (Ctrl + Z or Command + Z for Mac) or History panel to backtrack if needed. Adjust the brush size and sampling sources for varying areas.
- Check Overall Image: Zoom out to review the entire image and ensure all dust and scratches are effectively removed.
- Save the Edited Image: Once satisfied, save the image in your preferred format while maintaining high quality.
Advanced Tips for Better Results
- Clone Stamp Tool: For more stubborn or intricate imperfections, the Clone Stamp Tool can be used similarly to the Healing Brush Tool for removal.
- Multiple Layers: Consider working on separate layers for editing to retain the original image integrity, enabling easier adjustments if required.
- Blur or Sharpen Filters: After removing imperfections, apply subtle blurring or sharpening filters to refine the overall image.
Conclusion
With the right tools and techniques in Photoshop, you can effortlessly restore product images, erasing imperfections like dust and scratches, and present your offerings in their best light, captivating potential buyers with immaculate visuals.
FAQs
Can Photoshop automatically remove dust and scratches from images?
Photoshop has tools like the Dust & Scratches filter, but it’s not always recommended as it might blur fine details. Manual editing with tools like Healing Brush yields better results.
Are there any shortcuts for faster dust and scratch removal?
Keyboard shortcuts like changing brush sizes (Square Bracket keys: [ and ]) and zooming (Ctrl/Cmd + plus/minus) can expedite the editing process.
Does removing dust and scratches affect the image quality?
When done meticulously, manual removal should maintain or even enhance image quality by eliminating distracting imperfections.
How do I learn more about advanced image restoration techniques in Photoshop?
Online tutorials, forums, and Photoshop-specific courses offer in-depth guidance on advanced photo restoration and editing techniques.
This page was last edited on 28 February 2024, at 10:16 am