The world beneath the ocean’s surface is a mesmerizing realm of vibrant colors and breathtaking marine life. However, capturing the beauty of the underwater world through photography or videography can be a challenging task, often plagued by color distortion due to water’s unique properties. This is where color correction underwater comes into play. In this article, we will delve into the art and science of underwater color correction, exploring the techniques, tools, and tips to help you bring the stunning underwater world to life in your visuals.
Understanding the Challenge of Underwater Color Distortion
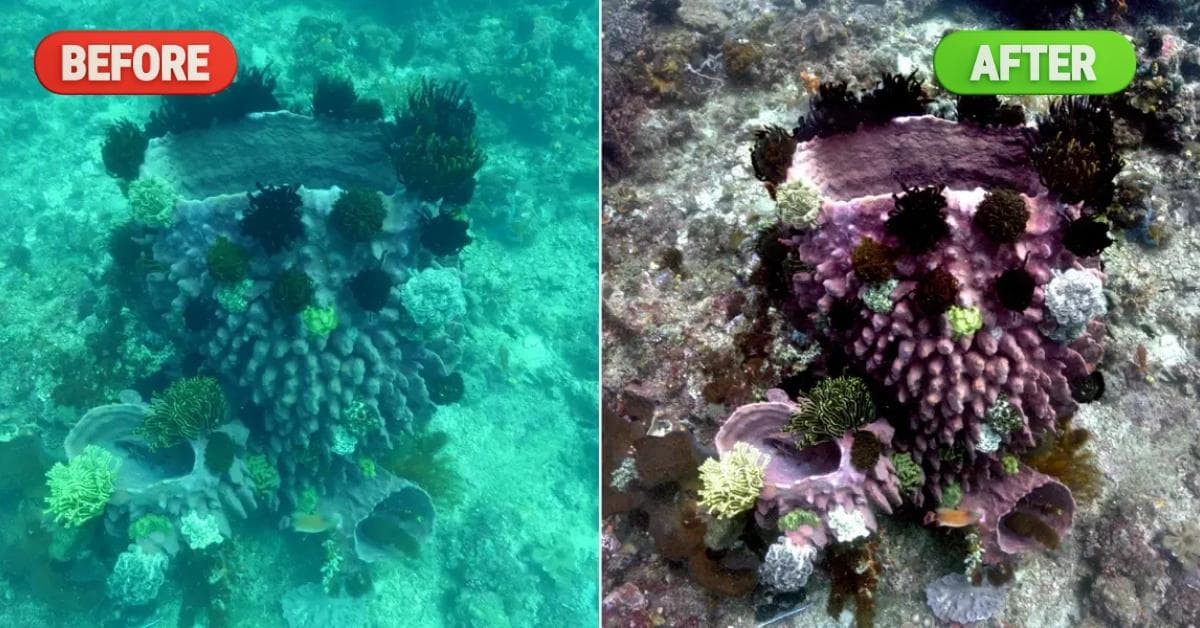
When you dive beneath the surface, several factors come into play that alter the way colors appear in your photos and videos. The main culprits include:
- Absorption and Scattering: Water absorbs and scatters light, particularly in the red and yellow spectrums. This results in a loss of these warm colors, making your underwater shots appear blue or green.
- Depth and Distance: As you go deeper, colors fade, with reds disappearing first. Additionally, objects at a distance may appear more colorless and blue due to the scattering of light.
- Particles and Algae: Suspended particles and algae can further distort colors, introducing unwanted hues into your shots.
Techniques for Effective Color Correction Underwater
To counter these challenges and bring out the true beauty of the underwater world, you’ll need to employ various color correction and photo editing techniques and tools:
- White Balance: Setting the white balance on your camera is crucial. Many underwater cameras offer presets for different water conditions. Custom white balance can be more accurate.
- Filters: Using color correction filters, such as red or magenta filters, can help restore lost colors. These filters compensate for the water’s absorption properties.
- Color Correction Software: Editing software like Adobe Lightroom or Photoshop can be invaluable for fine-tuning colors, contrast, and exposure in your underwater images.
- Selective Color Adjustments: In post-processing, focus on specific color channels to enhance or reduce certain colors, helping to restore the natural look.
- Manual Adjustments: Sometimes, manual color correction is necessary. Adjust the saturation and hue of different color channels to achieve the desired effect.
Best Practices for Underwater Color Correction
- Shoot in RAW: Capturing images in RAW format provides more flexibility during post-processing, allowing you to correct colors more effectively.
- Proper Lighting: Good lighting is essential. Use external strobes or video lights to illuminate your subjects and reduce the color distortion caused by insufficient natural light.
- Practice Patience: Experiment with different settings and techniques. Achieving perfect color correction may take some time and practice.
- Be Mindful of Depth: As you descend, be aware of the changing colors and make adjustments as needed.
- Avoid Overcorrection: Striking a balance is key. Overcorrecting colors can make your images appear unrealistic.
FAQs
Q1: Can I use the same color correction techniques for photos and videos?
A1: Yes, many of the same techniques apply to both photos and videos, such as white balance adjustment and the use of color correction filters.
Q2: What’s the best white balance setting for underwater photography?
A2: The ideal white balance setting depends on your depth and water conditions. Experiment with your camera’s presets or use custom white balance for accurate results.
Q3: Are there any specific color correction tools or software designed for underwater content?
A3: While there are specialized tools and plugins for underwater color correction, popular photo and video editing software like Adobe Lightroom and Adobe Premiere Pro work effectively with underwater content.
Q4: How can I avoid color distortion caused by particles and algae?
A4: Using color correction filters, good lighting, and careful post-processing can help minimize the impact of particles and algae on color distortion.
Q5: What are the common mistakes to avoid when doing underwater color correction?
A5: Avoid overcorrection, as it can make your content look unnatural. Also, be cautious with filters, as the wrong filter can worsen color distortion.
Conclusion
Mastering the art of color correction underwater is essential for any underwater photographer or videographer. By understanding the challenges posed by water’s unique properties and employing the right techniques and tools, you can bring the true colors of the underwater world to life in your visuals. Remember to practice and experiment to refine your skills, and soon, you’ll be capturing the enchanting underwater world in all its glory.
This page was last edited on 22 February 2024, at 11:32 am