Figma has become a popular design tool for its user-friendly interface and collaborative features. One common design task is masking an image to a shape, which can add creativity and visual appeal to your projects. In this article, we will guide you through the process of how to mask an image to a shape in Figma. You’ll also find frequently asked questions (FAQs) at the end to address any lingering doubts.
1. Selecting Your Shape
The first step in masking an image in Figma is to choose the shape you want to use as the mask. This shape will determine how the image appears after masking. You can select from various shape tools provided by Figma, such as the Rectangle, Ellipse, or Pen tool.
2. Placing Your Image
Once you have your shape ready, import the image you want to mask. You can do this by dragging and dropping the image directly onto the Figma canvas. Position the image over the shape to see how it aligns.
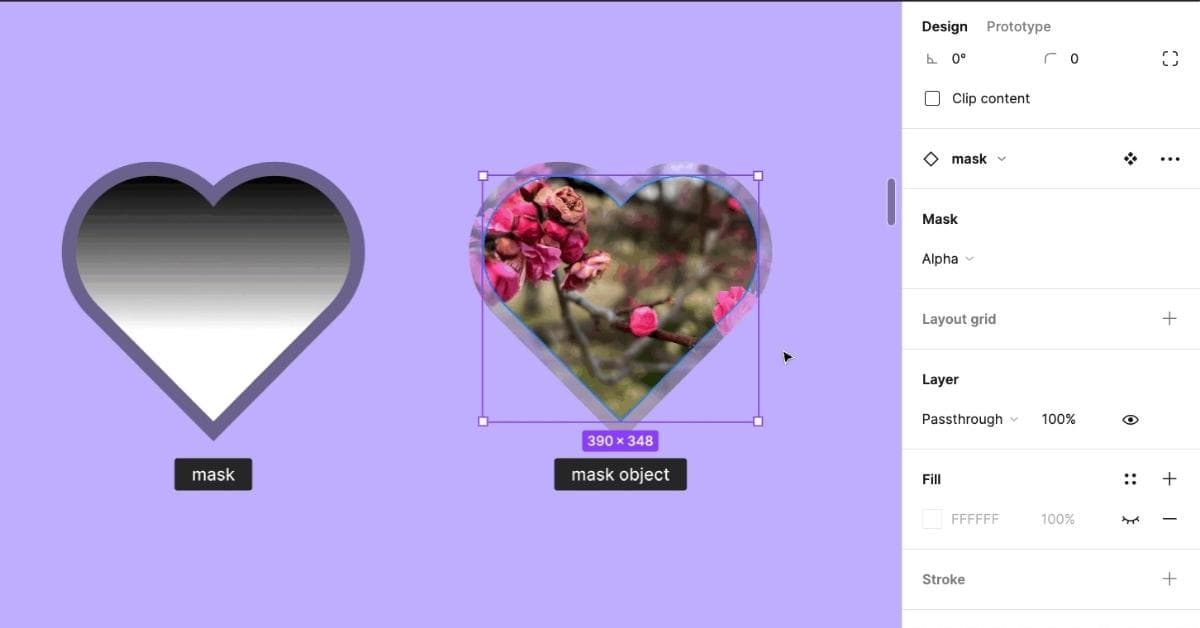
3. Masking the Image
To mask the image, follow these steps:
a. Select both the shape and the image by holding down the Shift key and clicking on each element.
b. Right-click on one of the selected elements and choose “Mask” from the context menu, or use the shortcut Ctrl/Cmd + Shift + M.
Your image will now be masked to the shape you’ve chosen, giving it a defined appearance within the boundaries of the shape.
4. Adjusting and Fine-Tuning
After masking, you may need to make adjustments for a polished look:
- Positioning: Move the image within the shape to get the desired portion in view.
- Resizing: Adjust the size of the image by selecting it and dragging the handles.
- Rotation: Use the rotation handle to rotate the image if needed.
- Opacity: Change the opacity of the shape to create a translucent effect.
5. Saving and Exporting
Before you complete your project, make sure to save your work in Figma by clicking on the “Save” button in the top left corner or using the shortcut Ctrl/Cmd + S. To export the masked image, go to “File” > “Export” and choose your preferred format and settings.
FAQs
Q1: Can I use custom shapes as masks in Figma?
Yes, you can create custom shapes using the Pen tool or combine existing shapes to use as masks in Figma.
Q2: Can I apply multiple masks to the same image?
Yes, you can mask an image with multiple shapes by selecting them all and using the “Mask” function. This creates complex masking effects.
Q3: Can I change the masked image later if needed?
Absolutely, you can edit the masked image by selecting it, right-clicking, and choosing “Edit Mask.” This allows you to adjust the image within the shape.
Q4: How can I create intricate masking effects like text inside shapes?
You can create text masks by placing text inside a shape and selecting both the text and the shape to mask them together.
Q5: Can I use images with transparency for masking?
Yes, images with transparent backgrounds can be effectively masked to custom shapes in Figma.
In conclusion, masking an image to a shape in Figma is a useful image editing technique for designers to create unique and visually appealing designs. By following the steps outlined in this guide, you can easily accomplish this task. Explore different shapes, experiment with settings, and unleash your creativity in your design projects.
This page was last edited on 20 February 2024, at 4:16 pm